
A primer on the assessment of overhead throwing mechanics.
Looking for guidance on the windmill softball pitch? Click Here.
Proper throwing mechanics are essential for both injury prevention and effective rehabilitation in throwing athletes. Understanding and evaluating these mechanics is crucial for athletes of all levels, as poor mechanics can lead to a range of injuries, from minor strains to serious ligament damage. By systematically assessing throwing mechanics, we can identify potential issues before they become serious problems and tailor rehabilitation programs to address specific mechanical faults.
Why Assessing Throwing Mechanics is Important

Throwing is a complex, high-stress activity that involves a coordinated sequence of movements across multiple joints and muscle groups. Each phase of the throwing motion—from the wind-up to the follow-through—places significant demands on the body, particularly the shoulder and elbow. When any part of this kinetic chain is out of sync, compensatory movements can occur, leading to overuse injuries and decreased performance.
Assessing throwing mechanics allows clinicians to:
- Identify Mechanical Flaws: Detect early signs of mechanical issues that could predispose an athlete to injury.
- Optimize Performance: Ensure that athletes are using efficient and effective movement patterns, which can enhance their overall performance.
- Tailor Rehabilitation: Customize rehabilitation programs based on the specific mechanical deficits identified during the assessment.
- Prevent Injuries: Implement corrective exercises and strategies to address mechanical flaws, thereby reducing the risk of future injuries.
A thorough assessment of throwing mechanics not only helps in diagnosing existing problems but also plays a pivotal role in preventing injuries and enhancing the longevity of an athlete’s career. By focusing on the biomechanics of throwing, we can provide athletes with the tools they need to perform at their best while minimizing the risk of injury.
On this page, we provide a general primer that can be utilized by folks from novice to expert in an effort to better understand how to maximize efficiency and reduce risk of injury. Assessments are typically best-performed via slow-motion video capture that can be stopped at certain time-points to allow for the best viewing opportunity. Always try to utilize more than one angle of video to ensure an accurate assessment.

Check our our Throwing Mechanics Checklist to help guide the process!
In this document, we help provide structured criteria to look for and document when performing a mechanics assessment of the overhead thrower


Phase-by-Phase Guide
1. Wind-Up Phase (Balance Point)
Key Focus Areas:
- Body Position: Observe the athlete’s initial stance. Ensure they have a balanced, athletic posture.
- Hand and Arm Movement: Check for smooth and coordinated arm movements as the athlete starts to bring the throwing arm back.
- Hip and Shoulder Rotation: Look for proper rotation of the hips and shoulders as the body begins to coil.
- Weight Shift: The athlete’s weight should begin to shift from the back leg to the front leg.

2. Stride Phase (through Stride Foot Contact)
Key Focus Areas:
- Stride Length and Direction: Measure the stride length and ensure it’s directed towards the target. A too-short or too-long stride can affect balance and power.
- Lead Foot Contact: Ensure the lead foot lands in line with the target and the knee is slightly flexed.
- Trunk Rotation: Observe the timing and extent of trunk rotation. Proper separation between the hips and shoulders is crucial.

3. Arm Cocking Phase (through Maximum ER)
Key Focus Areas:
- Shoulder Position: The throwing shoulder should be abducted to about 90 degrees with the elbow slightly below shoulder height.
- Scapular Positioning: Look for proper scapular retraction to help with arm movement and stabilization.
- Pelvis and Trunk Position: Check for proper alignment of the pelvis and trunk. The trunk should remain stable while the arm moves into external rotation.
- Elbow Angle: Ensure the elbow is flexed at approximately 90-100 degrees.

4. Arm Acceleration Phase (through Ball Release)
Key Focus Areas:
- Hip and Trunk Rotation: Monitor the timing of hip and trunk rotation. Hips should rotate before the trunk to generate power.
- Shoulder and Elbow Motion: The shoulder should rapidly internally rotate while the elbow extends.
- Hand Position: Ensure the hand maintains a good grip on the ball with proper wrist flexion.
- Knee Drive: The drive leg should extend and the lead leg should brace to transfer energy up the kinetic chain.

5. Arm Deceleration Phase (after Ball Release)
Key Focus Areas:
- Follow-Through Path: Observe the follow-through path of the arm. It should continue naturally across the body.
- Trunk Flexion: The trunk should continue to flex forward after ball release.
- Lead Leg Stability: The lead leg should remain stable and braced to absorb the forces.
- Head Position: The head should remain steady and aligned with the target.

6. Follow-Through Phase
Key Focus Areas:
- Body Position: Ensure the athlete maintains balance throughout the follow-through.
- Arm Path: The throwing arm should decelerate naturally and not come to an abrupt stop.
- Weight Distribution: Weight should shift smoothly from the back leg to the front leg.
- Recovery: Check for signs of overuse or fatigue, such as abnormal arm or shoulder movements.

Tips for Effective Slow-Motion Analysis
- Use Multiple Angles: Capture videos from different angles (side, front, and rear) to get a comprehensive view of the mechanics.
- Consistent Markers: Place markers on key anatomical landmarks (shoulder, elbow, hip, knee) to track movements accurately.
- Frame-by-Frame Review: Analyze the video frame-by-frame to identify subtle mechanical issues.
- Compare to Ideal Models: Use videos of skilled athletes as a reference for ideal mechanics.
- Track Progress: Regularly capture and compare videos to monitor improvements and make necessary adjustments.
By breaking down the throwing motion into these phases and using slow-motion video capture, you can conduct a detailed and effective assessment of an athlete’s mechanics, ultimately helping to enhance performance and reduce the risk of injury.
Common Mechanical Faults to Look For
Here are some common mechanical issues that throwers will present with alongside the philosophy of “why they’re bad”.
Inverted L/W

Fault: The inverted L/W is an often-coached pitching technique where the pitcher’s elbows are raised above the level of the shoulders, creating an “inverted W” shape with the arms during the arm-cocking phase.
Impact: The inverted W position can cause the lead foot to land early, requiring the pitcher to speed up the arm to catch up with the lower body. This mismatch in timing increases the stress on the arm, particularly the shoulder and elbow, which can lead to overuse injuries.
Solution: “Part-whole” training where phase-by-phase mechanics drills are used to reinforce proper positioning and sequencing. Glove breaks at the wall will prevent the elbow immediately driving up and behind. Wall angel exercises will reinforce the more-efficient early-to-late cocking positions.
Hyperabduction

Fault: The hyperabducted pitching technique involves the pitcher’s arm moving excessively away from the body during the arm-cocking phase, resulting in a high degree of shoulder abduction. This technique can significantly impact the pitcher’s biomechanics and injury risk.
Impact: Hyperabduction leads to greater relative external rotation of the shoulder, placing additional stress on the shoulder joint and surrounding musculature. This increased stress can contribute to shoulder impingement, rotator cuff injuries, and labral tears. Further, it can also disrupt the natural kinematic chain of pitching, leading to inefficient energy transfer from the lower body through the torso to the arm. This inefficiency can decrease pitch velocity and control.
Solution: Glove breaks against the wall to resist increased abduction. Ensure proper lower-half dissociation and trunk positioning.
Opening too soon / “Flying Open”

Fault: “Flying open” refers to the pitching fault where the pitcher’s front side, including the shoulder and hip, rotates too early in the pitching delivery. This premature rotation disrupts the natural sequencing of the pitching motion.
Impact: Opening the front side too early disrupts the timing of the pitching delivery. Proper timing is crucial for effective energy transfer from the lower body through the torso to the arm. Premature rotation can cause the arm to lag behind, leading to inefficient mechanics. To compensate for the disrupted timing and reduced energy transfer, pitchers often put additional strain on their arm to achieve the desired pitch velocity. The premature rotation also affects the pitcher’s ability to maintain a consistent release point, resulting in pitches that miss their intended target.
Solution: Ensure proper core/hip strength, weakness in these areas can manifest in early opening. “Part-whole” training with an added emphasis on hip-shoulder dissociation and hip turns should be used. Also check front-side LE ROM, especially hip IR/ER as limitations here can limit optimal mechanics.
Disconnected backside

Fault: A “disconnected backside” in pitching refers to a situation where the pitcher’s lower body and upper body are not working together efficiently during the pitching motion. This can be evident right at (or before ball release) wherein the back foot is no longer in contact with the ground.
Impact: Once the back foot leaves the ground, all power transfer is complete and the pitcher can no longer utilize this potential kinetic energy. When the lower body and upper body are not synchronized, the pitcher often compensates by using more arm strength to generate velocity. This additional arm effort can increase stress on the shoulder and elbow, leading to a higher risk of injuries such as SLAP tears and ulnar collateral ligament (UCL) injuries.
Solution: Utilize drills that encourage a rear toe-drag during the throwing motion with a good feel of pushing off with the backside hip/leg. Lateral plyometric drills can help with push-off strength. Overstride/figure 8 drills with isolated hip rotation can train hip-shoulder separation with the rear-foot still in contact with the ground.
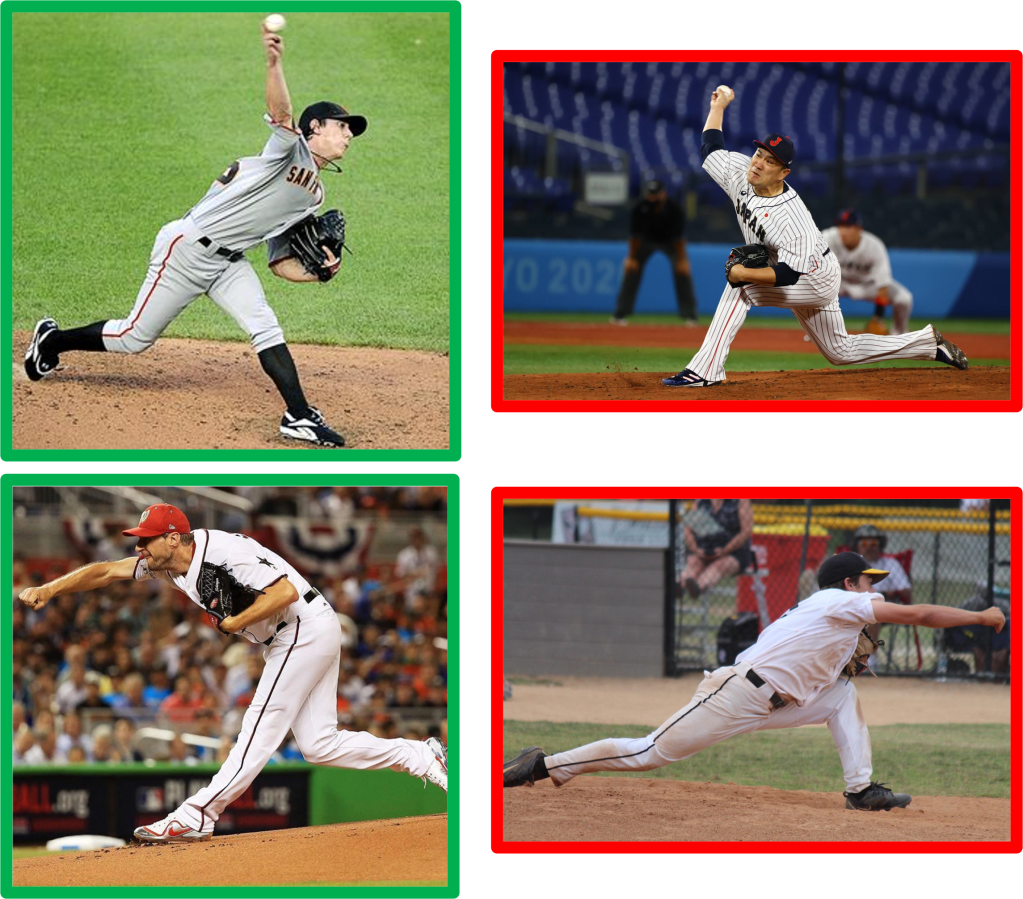
Front foot contact (too open or closed)
Fault: Stride foot lands too “open” or “closed” (ideal angle of 10-15° closed).
Impact: This causes an uncoupling of the kinetic chain, especially if too “open” when the stride foot lands at 0°+ like the photo on the right. Doing so will cause the arm to drag, placing undue strain along the UCL and anterior shoulder. If too closed, then the pitcher will be forced to throw “across” their body, losing a lot of the force generation from the lower half.
Solution: Utilize visual cues (tape lines, paint marks, etc.) to allow for instant feedback after the throw. Use repetitive training with shadow/towel throws followed immediately by throwing with a self-check to reinforce the pattern. Figure 8 drills can help pattern the movement.
Understride/overstride

Fault: Ideal stride length is approximately 80-100% of body height.
Impact: Overstriding will generally cause the pitcher to lose balance and disrupt timing of the throw. The “goldilocks” zone of 80-100% height seems to allow for optimal timing of the lower half, torso, and arm to produce the greatest efficiency. Understriding will completely eliminate the potential energy generated from the ground through the legs, forcing the arm to work that much harder to generate the same velocity.
Solution: Encourage full strides even with shorter throws to really ingrain the habit. Use visual cues (tape lines, marks in the dirt) to give a feedback mechanism on stride length. A crossover-step when throwing 60’+ will usually keep the lower half active and encourage appropriate stride length.
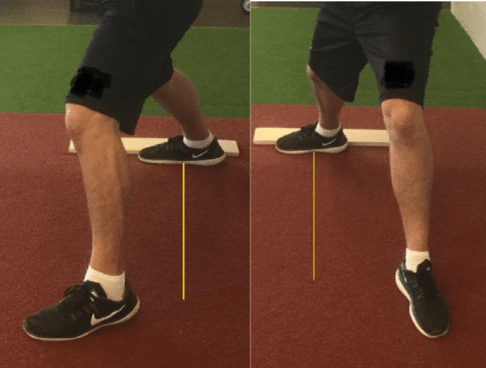
Knee flexion angle / insufficient bracing
Fault: Front-side/stride leg lands in overly-flexed position (>30-40°).
Impact: This causes a loss of pelvic rotation potential, reducing contributions from the lower half. The quad and glute should be engaging in synergy to produce a powerful “backwards” rotation of the front-side pelvis.
Solution: Strengthen quads/glutes. Split lunges, split squats, dead lifts, plyometrics should be utilized to maximize power and strength of the lower half. Encourage hip/trunk dissociation during throwing.
Key Events and Breakdowns

A lot of these events can be attributed to the foundational work by biomechanists and researchers who critically analyze the pitching motion to an extreme degree. This data provides clinicians with powerful information when performing throwing assessments to better understand athlete limitations and guide correctives.
Additional references:
- Smith S. The Effect of Stride Length on Pitched Ball Velocity. Spring 2017 Baseball Research Journal
- Ramsey DK, Crotin RL, White S. Effect of stride length on overarm throwing delivery: A linear momentum response. Hum Mov Sci. 2014 Dec;38:185-96. doi: 10.1016/j.humov.2014.08.012. Epub 2014 Nov 9. PMID: 25457417.
- Rod Whiteley. (2007) Baseball Throwing Mechanics as They Relate to Pathology and Performance – A Review. Journal of Sports Science and Medicine (06), 1 – 20.
- Manzi JE, Yu JS, Sudah SY, et al. A Systematic Review of Lower-Body Kinematic and Strength Factors Associated With Pitch Velocity in Adult Baseball Pitchers. Journal of Sport Rehabilitation. 2023;32(4):440-448. doi:10.1123/jsr.2022-0059
- Van Trigt B, Schallig W, Van der Graaff E, Hoozemans MJM, Veeger D. Knee Angle and Stride Length in Association with Ball Speed in Youth Baseball Pitchers. Sports. 2018; 6(2):51. https://doi.org/10.3390/sports6020051
- Douoguih WA, Dolce DL, Lincoln AE. Early Cocking Phase Mechanics and Upper Extremity Surgery Risk in Starting Professional Baseball Pitchers. Orthopaedic Journal of Sports Medicine. 2015;3(4). doi:10.1177/2325967115581594
- Diffendaffer AZ, Bagwell MS, Fleisig GS, Yanagita Y, Stewart M, Cain EL Jr, Dugas JR, Wilk KE. The Clinician’s Guide to Baseball Pitching Biomechanics. Sports Health. 2023 Mar-Apr;15(2):274-281. doi: 10.1177/19417381221078537. Epub 2022 Apr 23. PMID: 35465789; PMCID: PMC9950989.
In need of some help? Looking for a professional throwing mechanics analysis?

Let our experts handle it.
Our team is here to help you perfect your form, prevent injuries, and maximize your performance. Whether you’re a seasoned athlete or just starting, a professional throwing mechanics analysis can provide the insights you need to excel.
Click the button to learn more and fill out our request form and get started on your journey to better mechanics and enhanced performance today!